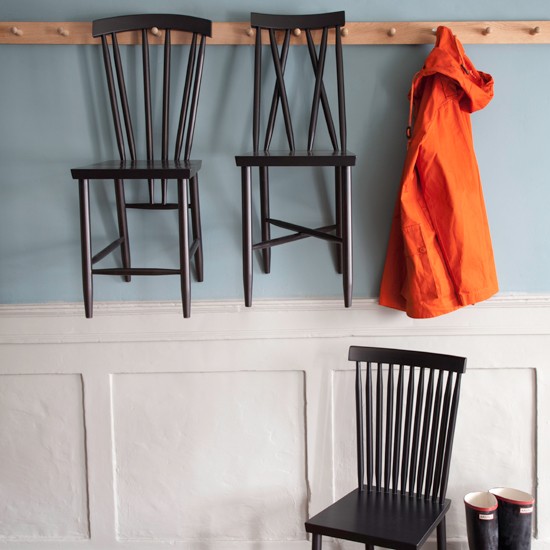

What a clever storage idea! Hang spare guest chairs on walls if you dont have space to store them on the floor in a small flat. Then use them as shelves for pretty objects. One in a bedroom to store summer hats on would also be nice!

What a clever storage idea! Hang spare guest chairs on walls if you dont have space to store them on the floor in a small flat. Then use them as shelves for pretty objects. One in a bedroom to store summer hats on would also be nice!

French Connection launched a really lovely homewares range last year. This January in the sales I managed to get myself a great deal on a pale grey linen throw and some matching bed cushion covers. Here are some other nice photos from their range as a nice change from bathroom taps!


What a great idea for drying clothes in a small flat! I have seen these online in plastic before, but never in this nice polished chrome finish from Smedbo. I will have to see if this can be worked into the bathroom design somewhere so I can hang clothes to dry over the tub. It is available from numerous stores online and would also work well in a laundry room or kitchen.

I am working on a project at work with a vacant site in south London and was trying to establish whether it was the result of bomb damage. While searching online I found this fascinating website made by the BBC which shows all of the WW II bomb sites across London, with photos where available. I did a little check for my area, then zoomed out... Check out the website here!


This week I started ordering things for my bathroom refurbishment project at last. The Duravit sink and basecabinet are on a 4-6 week lead time, but the brassware from Crosswater, including the shower shown above, the bath pillar taps, and the sink tap should be delivered next Tuesday.
After much deliberation about whether or not to have a concealed pipework shower system I decided to go with the exposed system above. (Notice the rail detail, which I am hoping will match the towel rails nicely!). This will save me the cost of furring out the wall to allow space for the thermostatic mixer and pipes, and more importantly will save me 6" of valuable space at the end of my tub where I am hoping to install a small, tall medicine cabinet.

Having pretty much decided on these Smedbo AIR range towel rails above (from the same range I have in the WC), I was disappointed to find that they only came in 600mm lengths, and therefore will not quite fit in the 500mm of wall space I have available.
After much internet searching I finally found a pretty good second choice. They are called 'Concept' and are made by Ideal Standard and have no visible wall fixings, no bulky roses and are pretty similar in design to my original preference. They come in 300mm, 450mm & 600mm lengths. My only complaint is that they have an 18mm diameter rail, which is chunkier than the slender 14mm diameter rail in the Smedbo range, but as they will mostly be concealed by a towel for 90% of the time, I guess this will be ok.

Along the way I also found these from Roper Rhodes bathrooms which are quite nice:

And these from SDS Ironmongery bathrooms which have a nice rail fixing detail, although I dont like the rectangular roses at the wall:


At home in Canada I had a big filing box filled with magazine clippings of kitchen and bathroom ideas, and buildings that I liked. I'd never brought them over to the UK as paper is so heavy. So, as part of my annual clear out I whittled the pages down to a dozen or so (which I still liked... tastes change!), and have been slowly finding equivalent images on the internet and 'pinning' them onto Pinterest.
Today I just finished the job, along with adding Pins for one of the 2 binders of magazine clippings I had been saving over here in the UK over the past 8 years. One binder down, 6 more to eventually digitize!

At last my mosaic tile samples finally arrived! Ive ruled out the larger dark grey hexagon tiles in favour of the small ones. I really like the light grey ones with the subtle tonal differences between tiles which gives it a more natural look, but I think that with all the other white glossy surfaces (sink, cabinet, walls), it may all be a bit too wishy-washy and some contrast would be better.


I have therefore decided on these small dark grey mosaic tiles. I like their perfectly cut edges - it gives a traditional tile style a contemporary twist and I think they will look really sharp. As for the grout - it will be dark grey to match as close as possible so it doesnt look too busy.


Before:

After:


I'd then line the drawers with sunshine coloured wall paper like this (below), called Little Trees from Missprint, available from this website

Or Saplings, also from Missprint:

Or Dandelion, also from Missprint:

Rather than making bed boxes from scratch, I realised that if these IKEA PAX wardrobe drawers (called Komplement) were just a little bit shorter, they would work perfectly! Figured I'd share the idea anyway as a pair of these would probably do the trick for someone looking for extra storage space, and I wanted to remember the idea!
Take two of these IKEA Komplement drawers (£22 each). They are 160mm tall:

Then just screw in four of these 50mm diameter rubber tyre swivel casters (Pack of four from Screwfix for £13.95). They are 64mm tall.

Or, if tight is space, try some of these single direction low profile castors which are just are 28mm tall. (Slightly less preferable as then you have to pull the drawer out perfectly straight)

Now that I have some space under my bed, I've decided it would be useful to have some under-bed storage drawers on castors for ease of use. Looking on line turned up a number of options, but they are all too tall to fit. The time wasnt wasted as it gave me some good ideas. Looks like a weekend DIY project is in the works...

This is the sort of thing I was envisioning...

What a brilliant idea for a kids bedroom!

These economical guys are from IKEA, but are too tall to fit.

I like the natural wood and circular pull hole, but these are also too tall, and rather expensive.

Make lemonade... or alternatively you can:

I spent the whole day today successfully de-cluttering, and re-organising all the storage cupboards in the flat. I cleared out all the kitchen cabinets, (throwing out any expired food cans), emptied my wardrobes (gathering two big bags of clothes to donate to the charity shop), organised my clothes and managed to put some order into the jumble of building materials stored beneath my bed. Phew!
Narrow Converse shoe boxes made the perfect home for my collection of coloured tights!

Pile of rubbish I managed to clear out

Under Bed - Before

Under Bed - After (I've learnt that it is useful to still keep some of the good bits of wood for future DIY projects, so that's why some remain!)

Before I put them away until next year, here is a photo of the minimal extent of my Christmas decorating - a tangle of fairy lights in the fireplace, and some pillar candles. I had a really busy December so didnt get a chance to make this post this earlier. I really liked the blurry image, which didnt focus by total accident, but below is what it really looks like.
P.S. The Chimney draught proofing seems to be working, there is a little less flickering of the candles!


I decided to start my flat resolutions with the chimney draught-proofing in the hopes of keeping the flat a little cosier for the remainder of the winter. Online forums suggest two methods for draught-proofing non-used chimneys:
The problem with method 1 is that, as you can see from the above photos of the two chimney flues, there is a vast amount of space to fill. Little balls of news paper would just pile up in the void and I'd never be able to achieve an air tight seal. (The silver tube is the new flue lining the ground floor flat owner put in so he could use his chimney without smoking out the other flats!)
In reading about method 2, there were numerous complaints about the product, stating that it deflated quickly, punctured easily, and was difficult to inflate in situ (as i can well imagine!).
So, my brilliant solution was to combine the best aspects of both of these ideas into one. I filled two large plastic garbage bags with crumpled newspaper for each chimney flue. After stuffing one bag into place, by holding on the ties of it I could hold it in place while inserting the second bag. Pulling both ties down created a nice neat plug.

Last year I made a list of New Year Resolutions for the flat, (check out 'Winter' as a reminder). Below is that list with images of the highlights of what I accomplished. I didnt quite get around to refurbishing the bathroom as some unexpected building costs got in the way (namely an annoying roof leak and a water line upgrade), but overall I didnt do too badly!


